Purple Yam Pancakes with a Fall Twist

Life definitely got into the way of our blog. Although we have been busy, there has still been a lot of cooking going on behind the scenes. This is a meek attempt to try and resurrect this little project between me and my Prague sisters, A & N.

On a recent visit, my dear Filipino mom ventured off to a section of Prague known locally as Sapa or Little Hanoi. It’s definitely off the beaten track. It’s a hub of warehouses and shops located about a half hour drive from Prague’s center. The businesses are largely owned and operated by members of the Czech Republic’s large Vietnamese immigrant community. As a native New Yorker, it reminds me a bit of Chinatown, but on a much smaller scale. You could call it Viet-town. Here you will find wholesale items from toiletries to handbags to the latest Italian fashions. You will also discover some of the best tasting Vietnamese restaurants in town, as well as a number of Vietnamese grocery stores selling fresh blocks of tofu, yellow mangoes and you guessed it — purple yam!

My mom enjoys shopping at Sapa because the produce and the shopping experience (she is able to haggle for prices and she’s good at it) reminds her of the Philippines. It’s also the best place that will guarantee egg roll wrappers, fresh okra or lemongrass will be on sale! On one her visits, she found these purple yams that resembled Ube, also a purple yam used in many Filipino dishes. Knowing that it is a favorite root of mine, she happily brought some home to me. Love my mom!

image

Purple yam after being boiled, skinned and mashed. Sounds a bit like torture. Sorry Purple Yam.

So, when I got out of bed today and the usual pancakes were being requested by our twins, I felt the need to be a bit more creative with this Sunday morning staple. Just the night before, I had boiled the yams without any plans to use them. I thought that I would just slide the skins off,  mash them up and freeze it for future use. Instead, this turned out to be a great moment to give them a try. Plus my girls are also big fans of ube!

Prague’s October skies have been grey lately, sprinkling us with rapid showers and the need to bundle up! Therefore, this autumnal change has made me yearn for some of the season’s comforting flavors. And that’s how I came up with a purple yam pancake with a fall twist.

image

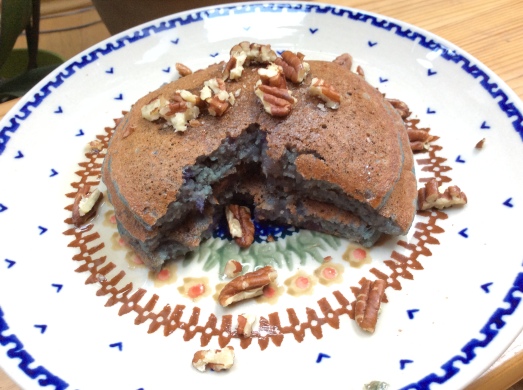
Purple Yam Pancakes (Gluten and Dairy Free)

Ingredients:

  1. Place purple yams in a medium saucepan of boiling water, and cook until tender but firm, about 15 minutes. Drain, and immediately immerse in cold water to loosen skins. Drain, remove skins, chop, and mash.
  2. In a medium bowl, sift together gluten free flour, baking powder, salt, nutmeg and cinnamon. Mix mashed yams, eggs, milk, sugar, vanilla and coconut oil in a separate medium bowl. Blend yam mixture into the flour mixture to form a batter. Enjoy that purple hue!
  3. Preheat a lightly greased griddle over medium-high heat. Drop batter mixture onto the prepared griddle by heaping tablespoonfuls, and cook until golden brown, turning once with a spatula when the surface begins to bubble.


Banana Muffins with Oats and Greek Yogurt! 

So, I suppose we do still blog here… Only after weeks of busy days at our normal jobs can we somehow find ourselves with a few minutes to share what we have been baking and creating in our kitchens. So here goes… I recently decided to experiment with other types of flour. I am loving coconut flour- it makes really good (and healthy) pancakes!

In my search for a double chocolate muffin recipe, using alternatives to wheat flour, I came across this recipe for Banana Chocolate Chip muffins using Greek yogurt and oats. I love throwing my overly ripe bananas into quick bread. I recently discovered a very good Greek style yogurt made with sheep’s milk. Since I usually have that on hand as well, thee muffins had to be made. 


This recipe is easy because you can throw everything but the chocolate chips into your food processor and let it all mash up really smooth. It is an easy way to prepare healthy (but tasty) muffins for your Monday morning breakfast or for whenever you want. These muffins are worth it… you can’t just eat one! But who cares because they are healthy. You can take my word for it or you can go to your kitchen and try it for yourself! Enjoy!

Banana Chocolate Chip Muffins

(using oats as a flour substitute and sheep’s milk Greek style yogurt)

ingredients:

1 cup Greek yogurt

1/4 cup brown sugar

2 ripe bananas

2 eggs

2 cups rolled oats

1 + 1/2 teaspoon of baking powder

1/2 tsp baking soda

1/4 teaspoon cinnamon

1/2 cup chocolate chips

Directions:

Preheat oven to 180 degrees C or 350 degrees F.

Line a muffin pan with liners or spray with cooking spray.

Add oats to your food processor and process for 2 minutes. Then add all ingredients (except chocolate chips) and process again until the batter is smooth. The oats should be broken down and blended.

Stir in chocolate chips by hand.

Fill muffin cups 3/4 full and bake for 15 minutes or until a knife inserted into the muffin comes out clean.

Allow muffins to cool on a baking rack.

Enjoy warm or for up to a week if stored in an airtight container.

(You can also freeze these muffins for up to three months.)

Enjoy!

Oh So Fabulous Buckwheat Chia Bread (GF and Vegan) by Allison

I’ve tried my fair share of vegan and GF bread recipes, and most of them were “no bueno” and ended right up where they belonged…..the garbage can. This recipe however is amazing, especially right out of the oven. Forget about it cooling completely before you slice into it! It’s high time to break the rules, just don’t burn your tongue in the meantime! Even your gluten-loving friends will enjoy this delicious bread. One trick…. I bake it longer than the recipe states, 15-20 minutes longer. Make it and let me know what you think!

buckwheat raw

FullSizeRender (1)
bread on plate

Buckwheat Chia Bread
slightly adapted from The Healthy Chef

Makes 1 loaf
300 g (10 1/2 oz / 1 3/4 cups) gluten-free whole raw buckwheat groats (found at DM here in Prague)
60 g (2 fl oz / 1/4 cup) whole chia seed
250 ml / 1 cup water (use half to soak chia seeds and the other half to combine in the food processor or blender)
60 ml ( 2 fl oz / ¼ cup ) olive oil
1 1/2 teaspoons gluten-free baking powder
1 teaspoon sea salt

Preheat oven to 160 C / 320 F. (fan forced oven).

Soak buckwheat in plenty of cold water for 2 hours until softened.

Soak chia seed in 1/2 cup cold water until gel like – this takes about 30 minutes.

Drain the buckwheat and rinse through a fine sieve. Make sure all the water is fully drained.

Place the buckwheat into a food processor.

Add chia gel, 1/2 cup of water, olive oil, bicarb soda, sea salt and lemon juice.

Mix in a food processor for 3 minutes. The bread mix should resemble a batter consistency with some whole buckwheat still left in the mix.

Spoon into a loaf tin lined with baking paper on all sides and the base.

Bake for 1 hour and 15 minutes until firm to touch and bounces back when pressed with your fingers. I bake it for 1.5 hours if I use one large loaf pan.

Remove from the oven and cool for approx. 30 minutes. Remove from the tin or loaf pan and cool completely on a rack or board. The bread should be slightly moist in the middle and crisp on the outside.

Cool completely before eating. Don’t do this….try it while it is hot!

Serve delicate slices only when cold with a serrated knife. Nah….you don’t need to follow this advice!

Store wrapped in the fridge for up to 1 week. (This bread can be frozen for up to 3 months)

Delicious lightly toasted in a cast-iron pan.
Serves 12

Coconut milk + Chia seeds + Lemon zest = a yummy, healthy treat!

The ingredients for a lovely treat!

The ingredients for a lovely treat!

Life has been very busy these days. It happens every Spring. There is more light in the day, sunny afternoons meant for beers and laughing with friends. There are weekend getaways with friends who will shortly be moving on from Prague. And there is the Elementary School musical that I have been working with all school year. On Friday, we have show number one so this week is all about marathon rehearsals and very little time for creating in the kitchen. But I like a little something sweet when I am tired. Instead of turning to chocolate or other bad calories, I am preparing my healthy treats for the week.

1 can of coconut milk, 1/4 cup chia seeds, 1 tablespoon honey- that is all this recipe needs. Of course you can jazz it up how you want. I have thought about adding a little cinnamon or chocolate chips or even mango purée. Today I was feeling the sunshine and decided to add lemon zest! All you have to do is put the ingredients in a bowl, mix until whipped and then leave in the fridge overnight. I prepare portions in small jars and as my Kindergarten learners would say- easy peasy.

Sweet, zesty, and yummy

Sweet, zesty, and yummy


Thanks to my Twinsie for serving this at brunch. My sweet tooth thanks you…

Zucchini Flowers in Town! by L

image

Spring is here! Well, almost. After an Easter holiday full of snow, sleet, sun and gusts of wind, it has almost arrived in Prague. Bursts of yellow and purple flowers have begun to pop up around town and even my favorite edible flower has found its’ way to our golden city. Zucchini flowers are here!image

image

I am all for the farmers markets, but there is another market that I head to when I want to get serious about Italian food. It’s called the Wine Food Market, located in Prague 5. Once upon a time, I lived in Italy and I ate well, very well. After that experience, I feel like nothing can ever compare to the Italian dishes I dined on for years. But… the Wine Food Market comes pretty close, especially their pizza!

image

This amazing eatery not only serves up lunch, dinner and homemade gelato, it also houses a market full of fresh vegetables, fruits, dry goods, a bakery and more! Local Prague friends, if you haven’t yet been or if you are someone planning a trip to Prague and may want to take a break from Czech food, this is the place to go. On my last visit, I found my beloved zucchini flowers and for dinner that night I cooked them up in my favorite style… fried.

image

Fried Zucchini Flowers stuffed with Mozzarella (Fiori di Zucchini)

12 zucchini flowers

1 large ball of mozzarella, cut into 12 small rectangles

Batter:

50 grams/2 oz flour

100ml/3 1/2oz beer

oil for frying

salt

Directions:

Wash your flowers and remove the pistils.

Gently place a slice of mozzarella cheese inside each flower and twist the tips of the petal to close.

For the batter, add the flour and pinch of salt into a bowl.

Then whisk in the beer until the batter is smooth.

Heat the oil in a deep-frying pan.

Quickly dip the stuffed zucchini flowers in the batter and drain off the excess.

Add batches of the flower to the frying pan, turning gently, until brown.

Drain on kitchen paper and serve hot.

GF Pavlova with a Twist by Allison

I tried making pavlova two times before with my hand-held “immersion blender/tool” but it was an epic fail. The egg whites just never got stiff enough and my “Tesco special” was not making the grade. So I gave up…..until I pulled my cobalt blue KitchenAid mixer out of my top cupboard. Why yes, I had a KitchenAid mixer but couldn’t ever get it to work properly as my voltage converter I had wasn’t working properly. A friend was getting rid of hers so whallah! I knew where all of the fuse boxes were and had access to all of them in case I blew any fuses, which I did, but I got my prized KitchenAid mixer to work! This definitely called for a re-do of the pavlova as I knew my KitchenAid would be able to get the job done. You see, I was such an avid baker that I decided to carry my KitchenAid mixer back with me from the U.S. to Prague in my carry-on bag several years ago. Oh you should have seen the looks on the security personnel’s faces! They were pulling each other towards the screen and shaking their heads in disbelief! One gentleman pulled me aside and said, “Mam, is this mixer yours?!” I replied, “Yes it is sir….” with a smile of course and he said, “Oh, well Mam, we haven’t seen a KitchenAid mixer come through here before! It is quite an unusual item to carry with you but everything is fine from our side, hope it makes the journey for you” and that was that! I knew it was a questionable item to take on the plane but I did have my Mom wait before she left the airport in case they wouldn’t allow it so I could give it to her to take home. But I gave my Mom the thumbs up signal and waved goodbye before I headed towards my gate on the other side of security.
FullSizeRender_2

Luckily I was flying business class on award miles and no one questioned the weight of my bag along my journey. In case you’re wondering, I was able to lift it into the overhead compartment on my own on two different flights as well! So you can imagine how rewarding it was for me to finally use it and to pull off a pavlova to serve at Easter brunch! The twist is the pavlova has cinnamon and vanilla bean in it…..and it is delicious, seriously delicious.

FullSizeRender_3

FullSizeRender_4

FullSizeRender_1

FullSizeRender


Now I just need to work on preventing the cracking of the pavlova so next time I won’t cook it as long!

recipe for the pavlova slightly adapted from The Kitchn

Ingredients 

For the pavlova:
6 egg whites
2 cups sugar
1 tablespoon cinnamon
1 heaping teaspoon balsamic vinegar
seeds scraped from a vanilla bean

To assemble:

2 small containers or 1 large container of liquid whipped cream 40% fat
2 Tbsp. icing sugar
1 tsp. vanilla extract
2 cups mixed berries for the top

To make the pavlova: Preheat oven to 350°F. Line a baking sheet with parchment paper. Using an electric mixer, beat the egg whites on medium speed until satiny peaks form. Add the sugar, 1 spoonful at a time, and continue beating until the mixture becomes stiff and very shiny.

Using a spatula, fold in the cinnamon, balsamic vinegar, and vanilla bean. Spoon the mixture onto the parchment-lined baking sheet, forming a 10-inch circle that is about 2-inches thick.

Place in the oven, and immediately turn the oven down to 300°F or 150°C. Bake for about 1 hour . When the pavlova is done baking, it should look and feel dry on top. Remove from the oven, and let cool in a dry place overnight.

The next day, invert the pavlova onto a serving dish, peel away the parchment and reverse onto another serving dish. The pavlova shell can be made up to 48 hours in advance. Be sure to wrap it well in plastic wrap and keep it in a dry place until ready to assemble.

To make the whip cream: Use an electric whisk to beat the whipping cream until smooth. Whisk in the icing sugar and vanilla extract.

To assemble the pavolva: Dollop the whipped cream into the center of the pavlova, leaving a 1-inch border. Sprinkle the fruit over the cream. Enjoy with friends and family!


Make Your Own Tomato Sauce


March 28 is the Prague Half Marathon. It will be my third time running in this event. I have been training for three months, starting most mornings with a 5am run in the cold, dark winter! It is not always fun and I am not always motivated. Of course, there are mornings I opt out and sleep an extra hour, but most mornings, I drag myself out bed knowing I will feel good when I finish.

As a morning runner, I don’t eat before hitting the pavement. My body is not used to having food before any 5 to 10km run. That is why I need to be  well fueled the night before I run! During these training months, I allow myself to include pasta once a week and usually the night before upping my mileage or doing a long run.  Baked chicken, steamed broccoli and a small amount of pasta with tomato sauce is a balanced meal fit for this runner. But that isn’t just any tomato sauce; it’s a homemade recipe with no additives or preservatives, no sugar and low sodium… And yes, it tastes great!  

 I used a variety of colored, grape tomatoes to make this batch. I want to try this recipe with plump, juicy roma tomatoes as they come in season this summer. The sauce is easy to whip up fresh during the work week- you can heat on medium for 15 minutes or if you have the time let it summer on low for an hour! I sometimes make a bigger batch on the weekend and freeze portions for later use! Whichever method you use-Enjoy! 

 Fresh Tomato Sauce 

Ingredients: 1-2 pints of grape tomatoes, 3 clove of garlic (chopped), 1 medium white onion (sliced), 1 tablespoon olive oil, 1/2 cup vegetable stock, 1 tablespoon chopped fresh parsley, 1 tablespoon chopped fresh oregano and salt and pepper to taste.  

Directions: 

In medium sauce pan, sauté onions and garlic in olive oil. Add tomatoes, stock, and herbs. If pressed for time, cook on medium heat for 15 minutes. Otherwise, simmer for 1 hour on low heat, stirring occasionally. Just before serving, I use an immersion blender for 20 seconds to blend the sauce. Just pulse it a few times to keep from getting too runny. You don’t have to do this but this is how I reach the consistency I like… Enjoy! 

Addicted to Green by L

photo 2(1)

During our summer road trip from Prague to Valencia, we had a little pit stop at our dear friend’s home in Saarbrucken. A’s home is absolutely cozy and stylish. Her hosting skills are beyond gracious and our tummies are always well nourished.

One morning at breakfast, I noticed that she was drinking out of a tall glass filled with a thick dark green liquid. Not exactly the most appealing vision for your first meal of the day. Of course I was curious, so I had to ask “What is THAT?”

photo 1(1)

“My spinach smoothie,” she quickly replied, “Want some, there’s some left in the blender.”

As mentioned, I was curious. So I poured what was leftover into a smaller glass and gulped it down. Surprisingly, it didn’t taste as bad as I thought it looked. It was actually the opposite. It was deliciously refreshing.

Since that day, I can’t start my mornings without a spinach smoothie. I’m absolutely addicted.

photo 3

Spinach Green Smoothie (So easy to prepare too!)

1 cup of fresh spinach leaves

1 banana

1/2 cup of berries or whatever other fruit you have in stock

1/2 cup of your choice of liquid: water, soy milk, kefir, rice milk, milk, coconut water or juice

Optional: spoonful of chia or flax seeds

Place all the ingredients into a blender.

Blend and enjoy!

Pears + honey + fall spices = Honey Pear Spice Muffins! by Nikki

It's Autum... and time for muffins!

It’s Autum… and time for muffins!

It is officially Autumn. The seasons have changed from warm Summer sunshine to crisp, cool Fall mornings. It is the time of year when the pumpkins and other squash varieties show up in the grocery store. The farmer’s market is full of deep, rich colors as the end-of-summer growing season has been recently harvested and is now available for our purchasing! When the daylight hours grow shorter and the rain begins to fall, I crave time in my kitchen, and I crave muffins. I LOVE muffins!  Experimenting with my basic muffin recipe brings my taste buds (and my friends) a lot of joy! A little flour, a few spices, one egg and a variety of “fillings”, and you have got yourself a tasty baked treat.

Thanks for the pears friends...

Thanks for the pears friends…

I have a new teaching colleague on our Kindergarten team this year. I am really enjoying working with and getting to know T… as well as her husband and family! In the first few weeks of school, T showed up in my classroom with a handful of pears that her husband, D had stopped to pick while on a bike ride with their daughter. I always appreciate good, fresh fruit… and these pears were gladly accepted! Combined with honey, fall spices and my favorite baking ingredient- buttermilk, these pears turned my standby honey spice muffin recipe into a pear-y good experience. And with only a 1/2 cup of sugar (and a whole lot of honey), these muffins were sweet with a hint of spice… and the verdict was they were  oh, so, nice!

Pear-y delicious

Honey Pear Spice Muffins

dry ingredients: 2 cups spelt flour, 1/2 cup sugar, 2 teaspoons baking powder, 1/4 teaspoon nutmeg, 1/2 teaspoon salt, 1/2 teaspoon ground ginger, 1 teaspoon cinnamon

wet ingredients: 1 teaspoon vanilla, 1 egg, 1/4 cup butter (melted), 1/4 cup honey, 1 cup buttermilk

fruit: 1 cup pears (peeled and diced)

Directions:

Preheat oven to 180 degrees C or 375 degrees F and line a muffin tin with muffin papers, set aside.

In a large bowl, whisk together dry ingredients then set aside.

In a small bowl, whisk together the wet ingredients until well blended.

Pour over the dry ingredients and mix with a wooden spoon.

Gently fold in the pears.

Spoon batter into the muffin cups until each is 3/4 full.

Bake for 15-18 minutes or until the tops are golden brown or a knife comes out clean from the middle of the muffin.

Let cool for 5 minutes then serve warm with a pat of butter.

Store muffins in an air-tight tupperware for up to 5 days or freeze for up to 3 months!

ENJOY!

Totally Amazing Tomatoes – GF, SF, DF, NF, and V of course

Once you’ve had fresh tomatoes from the garden that have been grown with love and tender loving care, then there’s just no comparison to the taste of mass-produced tomatoes that can be found at your go-to grocery store chain. The taste, the flavor, the color and even the texture are different between the home-grown or farmer’s market tomatoes and store-bought tomatoes. Don’t you agree? I adore tomatoes. Really truly. Sun-dried tomatoes are a must-have in my pantry at all times. I cannot run low on sun-dried tomatoes. Speaking of which….have you seen the ingredient list on the back of a sun-dried tomato jar? Brace yourself. Vegetable oil to top the list and too many other crazy things in there that shouldn’t be in there to be honest. So I took matters into my own hands. I bought a dehydrator and set out to dry my own tomatoes! The result?! Incredibly tasty tomato chips if you like crunchy things without preservatives and artificial ingredients. They are absolutely delicious. I’ve also made dehydrated tomatoes and am preserving them in olive oil. They are waiting to be consumed with other Italian delicacies one day soon. This is not a new idea, many people have dehydrated tomatoes, but I’m here to share with you how easy and amazing they really are and urge you to get a dehydrator!  photo 3photo 1

photo 4


Dehydrated Tomatoes by Allison

Tools: 

sharp knife

dehydrator

delicious tomatoes from a farmer’s market

cutting board

Method:

Rinse tomatoes, you may also need to de-stem and de-core your tomatoes depending on the variety to prepare them for dehydrating. Cut tomatoes into 1/4 inch to 1/3 inch slices and place on the dehydrator trays. Leave space in-between slices so the warm air can circulate around and between the tomato slices. I dehydrate mine at 55 degrees Celsius for 20-24 hours depending on the variety of tomato I used. You can sprinkle with salt, oregano, basil if you’d like. They are finished when they are dry and leathery. Sometimes I dehydrate them for 24 hours until they are brittle and eat them like chips or crisps. Either way they are delicious! Store in a sealed jar or freeze. Enjoy!